Are you finding Windows Copilot less helpful than expected? Or maybe you prefer to navigate your Windows 11 without the assistance of this feature. Whatever the reason, if you’ve been wondering how to disable or turn off Windows Copilot, you’re in the right place. In this post, we’re going to walk you through the steps on how to disable this feature.
What is Windows Copilot?
windows Copilot is a feature in Windows 11 that allows two people to use one computer. One user can control the other user’s PC, which can be great for troubleshooting or technical support. However, there can be instances where you may need to disable this feature, and that’s perfectly fine. Disabling it won’t cause any major issues for the operation of your computer.
How to Remove Microsoft Copilot from Windows 11 Taskbar
NOTE: The Windows Copilot can be accessed with the Windows logo + C hotkey even after removing its icon from the taskbar. If you want to get rid of Copilot, turn it off or disable it via group policy.
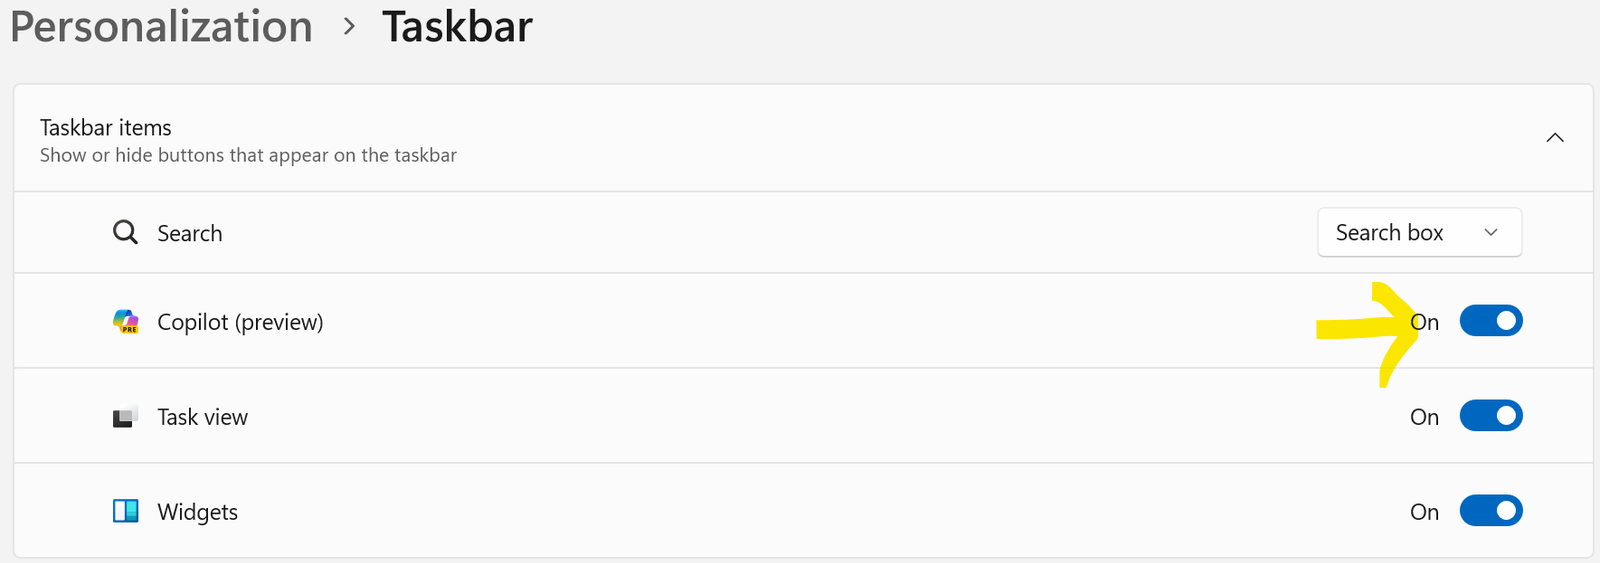
Step 1: Right click on takbar and select taskbar setting (or Go to Windows 11 Settings > Personalization > Taskbar page to see taskbar settings.
Step 2 : Turn off the toggle button next to Copilot to remove the Copilot icon from the taskbar.
Remove the Windows Copilot icon from the taskbar via Registry Editor
Before we get started, it’s crucial to understand that altering the registry keys should always be done with care. Editing the registry risks potential system instability.
Step 1: Open the Registry Editor by typing Registry Editor in the Start/taskbar search
Step 2: In the Registry Editor, navigate to the following key
HKEY_CURRENT_USER\Software\Microsoft\Windows\CurrentVersion\Explorer\Advanced

Step 3: on the right side, look for ShowCopilotButton. If absent, right-click on an empty space, click New, click DWORD-32 Value, and then name it ShowCopilotButton. Double-click on it.
Step 4: Set the value data to “0” (zero) to remove the Windows Copilot icon from the Windows 11 taskbar. That’s it
Turn off or disable Copilot in Windows 11 via Group Policy
Please note that Group Policy editor is available only in Windows 11 Pro, Enterprise, and Education editions.
Step 1: Open Group Policy Editor. Press Windows + R key to open the Run dialog box.
Step 2 : Type gpedit.msc in the Run dialog box and press Enter. This action will open Group Policy Editor.
Step 3 : User Configuration > Administrative Templates > Windows Components > Windows Copilot
On the right pane, find and double-click on the policy setting named “Turn off Windows Copilot”.
In the new window, select “Enabled” to disable Windows Copilot feature.Click “Apply” and then “OK” to save the new policy setting.
Once you’ve changed the policy to “Enabled”, Windows Copilot feature will be disabled for the users on the device or throughout the network (depending on the scope of the Group Policy).
If you want to re-enable the Windows Copilot feature in the future, follow the same steps and change the setting in Step 3 to “Not Configured” or “Disabled”. Remember that Group Policy changes might take some time to propagate, or you can force the update by running gpupdate /force in the Command Prompt.
